Graffiti Walls: Inspiring Creativity and Building Background Knowledge

No matter how young or old, all students love to get out of their seats, talk with their peers, and use colored markers or crayons to create graffiti! Using Graffiti Walls in your classroom is a great way to incorporate movement and conversation while engaging students in learning.

Graffiti Walls are shared writing spaces where students write their comments about specific topics or questions prior to a lesson. They help students activate their prior knowledge and give them a purpose for learning. Moreover, they are much more exciting than the overused K-W-L.

Research tells us that prior knowledge is one of the most important predictors in students’ acquisition of new knowledge. In fact, new knowledge is built on prior knowledge. The more we can help students engage and build prior understanding the more likely students are to learn the material. Prior knowledge also influences reading comprehension; indeed, prior knowledge of subject matter has been found to be more important than overall reading ability on comprehension (Recht & Leslie, 1988). Using Graffiti Walls prior to instruction and using text will help make connections between the known and the unknown and will set our students up for success.

How Do Graffiti Walls Work?

Planning

During the planning phase, teachers need to consider the big ideas and essential questions of the lesson or text they hope students will uncover during the lesson. These will become the basis for knowledge building prior to teaching and the ideas and questions on which we want student to focus as they are “tagging” (drawing, writing) the graffiti walls.

Activating Prior Knowledge

This is where the fun begins. Students, with colored markers or pencils in hand, rotate among the graffiti wall spaces and add their knowledge or questions, doing so in a creative way (i.e.: color, images, slogans, phrases, questions, etc.).

Building Knowledge

After students add to the Graffiti Wall spaces, it is important that there is time for reflection and discussion about the ideas on the spaces. This sharing of ideas and knowledge is how new knowledge about the topic/concept will begin to develop.

Filling the Gaps

Once students have bolstered their background knowledge, students may still have some knowledge gaps to fill. It is here where students will fill those gaps with information provided by the teacher or another source, such through their interaction with text(s) they might read on the topic/concept or information their find through an internet search.

Retagging the Walls

Finally, once students have accumulated new knowledge about a topic/concept, they return to the Graffiti Walls, add what they learned, and share with peers.

What Does it Look Like in the Virtual Classroom?

Due to the pandemic, much of our work with students is occurring full-time or part-time within a virtual environment. That means that we need to figure out how to reimagine all of those engaging and meaningful activities we use in our face-to-face classrooms for our online instruction. Below are several online tools you can use to help replicate the idea of the Graffiti Wall in the virtual world.

GraffiterThis space does not permit collaboration, but does give you an awesome selection of spaces upon which to draw as well as a bunch of fun graffiti artist tools (i.e.: paint, color, etc.).

Miro, Concept Board,  ZiteBoard, and AWWBoard are all online whiteboards designed for team collaboration that provides lots of tools and templates for drawing and writing. Users can also upload images and documents.

Common Sense Media Top Interactive Whiteboard Apps provides a list of vetted tools for use in the classroom setting.

References

Recht, D. R., & Leslie, L. (1988). Effect of prior knowledge on good and poor readers’ memory of text. Journal of Educational Psychology, 80(1), 16–20.


Print Friendly, PDF & Email

Flipping Over Flipgrid

Flipgrid is a free tool that uses the power of storytelling, social media, and technology to bring learners together to engage in powerful conversations about what they are learning. Teachers develop “grids” where they can post prompts for students who respond via a video recoding using a web browser or phone.


Flipgrid How To

Once you create your free user account, you can begin creating opportunities for active, social learning within your classroom.

Step 1: Create a Grid

Grids are sort of like home base for your classroom or class period. So, if you are teaching high school English 10, you might create a Grid for each class: English 10 Block I, English 10 Block II. Or if you are in a self-contained elementary classroom, you might just have one Grid, such as Mrs. Barnaby’s Super 4th Graders. Within the Grid, you can post as many discussions as your heart desires.

Step 2: Add Topics

Within each Grid, you add specific topics. The Flipgrid Getting Started Guide refers to topics as the “stimulus for conversation.” Within the topic, you can ask students to record a video response to your prompt or question as well as upload videos, links, images, GIFs, emojis, and references. For example, in your English 10 classroom, you just finished reading several chapters in To Kill a Mockingbird. You might post the following question and have your students respond via video recording: How does Boo Radley change over the course of these chapters and how does this change impact the events that follow? Or, within your elementary classroom you might be studying the life cycle of butterflies and you want your students to explain metamorphosis in their own language via video recording.

Step 3: Share the Grid and Collect Videos from Students

You can share your Grid and the topic with your students several ways: through your Google classroom, Microsoft Teams, Schoology, with a QR code, through the Remind app, or by giving students the code to type on the Flipgrid webpage. Here is a great Quick Start video to share with your students created by Abbey Thomas.

Ideas for Using Flipgrid in the Classroom

The ideas for using Flipgrid in the classroom are endless. From digital book sharing to virtual vocabulary word walls, teacher, Karly Moura shares 30 ways to use Flipgrid in the classroom on her blog. You can also check out The Educator’s Guide to FlipGrid written by Sean Fahey, Karly Moura & Jennifer Saarinen.

This history teacher uses Flipgrid to deeper students understanding about what they are learning, gets them to engage in civic discourse about current and past historic events, and has them use their creativity to take on different perspectives.

Flipgrid is also perfect for the elementary setting. In Building an Elementary Education Flipgrid Community, the authors provide examples of how to use Flipgrid across a variety of subject areas.

Want to take your learning about Flipgrid to the next level? Then get Flipgrid educator certified. There are 4 badges you can earn to show you are dedicated to putting the power of learning in the hands of your students.

The motto at Flipgrid is “Empower Every Voice.” How will you empower your students to use their voices?

Print Friendly, PDF & Email

Sparking Student Creativity and Ownership: Digital Storytelling in Your Classroom

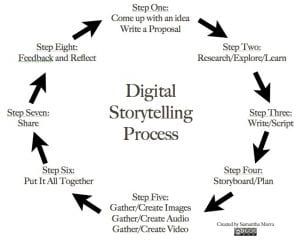
The Digital Storytelling Association defines digital storytelling as “the modern expression of the ancient art of storytelling. Digital stories derive their power by weaving images, music, narrative and voice together, thereby giving deep dimension and visible color to characters, situations, experiences, and insights” (Rule, 2018, 1). There are numerous benefits to having students create digital stories within the classroom, including engaging students in work around the 4 C’s: Critical Thinking, Creativity, Collaboration, and Communication. And, in eight easy steps, your students can create the next Gone With the Wind; ok, maybe not, but they will be super engaged in their learning and want to persevere until they have a great product. EdTech Teacher explains the 8 steps here.


Digital Storytelling in the Classroom

Digital storytelling takes your traditional project and gives it wings. Want students to write a narrative? Why not instead have them use multi-media to tell their story? Turn your typical boring book report into a digital review and ask you multimedia specialists to share student products on the library website so that other students can preview digital book reviews.   Have students practice their world language skills by asking them to create a digital tour of a famous foreign city. Throw away your poster board and glitter glue and have students take the place of a character in a story they are reading via the digital world. Have your students use technology to interview grandparents or war veterans or their favorite animal. Take the time machine and your technology back to Verona and have students write digital love letters from Romeo to Juliet. The ideas are as endless as your imagination. Looking for some other great ideas, check out iSpring for using digital storytelling across several different content areas.


Where do you find digital storytelling tools?

There are numerous tools you can use within your classroom and more and more tools continue to be added. My favorite, very easy to use tools, are Animoto and PowToon. Both permit students to add graphics, sound, narration, video, and other effects. Lucky for you, I have gathered a list of even more web tools and apps that you can use in your classroom here.


Print Friendly, PDF & Email

1 2 3 4 5 6 7